Adding a Pot Filler Above Your Professional Range (Is the Plumbing Worth It?)
Installing a pot filler above your professional range offers luxury convenience for Greenwich homeowners, but the plumbing comes with real risks. A leak behind a wall near your expensive Wolf or Viking range could cause thousands in water damage. This guide breaks down the true costs, installation process, and local building code requirements to help you decide if the luxury is worth the potential liability. Plumbing Stamford.
What a Pot Filler Actually Does in a Greenwich Kitchen
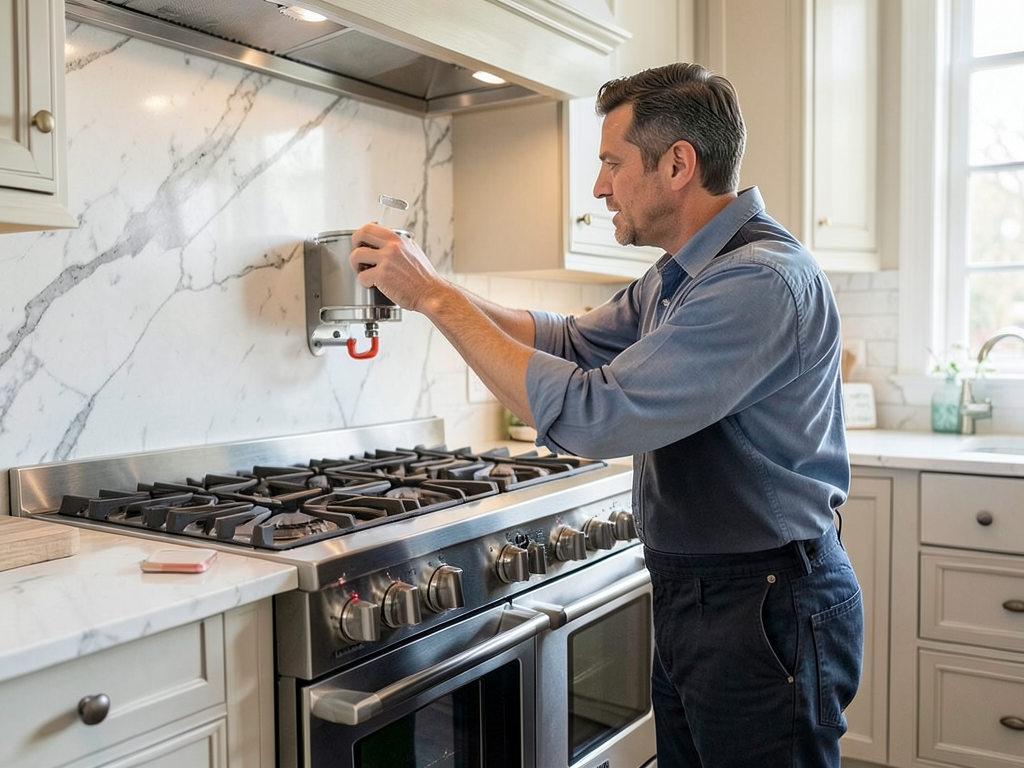
A pot filler is a swing-out faucet mounted on the wall behind your range that extends over the burners to fill large pots directly on the stove. In Greenwich’s high-end kitchens, they’re often installed as a designer feature alongside professional-grade ranges. The convenience means no more carrying heavy pots of water from the sink, but it also means running new cold water lines through finished walls and creating another potential leak point in your kitchen.
The typical pot filler installation requires cutting into drywall, running PEX or copper piping, and installing a new shut-off valve. In Greenwich’s historic homes, this often means dealing with plaster walls or working around existing electrical for the range hood. The brass fixtures themselves can weigh 8-12 pounds when extended, requiring proper wall reinforcement.
Wall-Mounted vs. Deck-Mounted Pot Fillers: Which Fits Your Range?
Wall-mounted pot fillers are the most common choice for Greenwich kitchens. They attach directly to the wall behind the range and swing out to reach both front and back burners. The swing arm typically extends 20-24 inches and must clear the range hood by at least 6 inches. In older Greenwich homes with limited wall space, this can be challenging when dealing with existing backsplash tiles or electrical outlets.
Deck-mounted pot fillers attach to the countertop behind the range. They’re less common in Greenwich because they take up valuable counter space and require drilling into expensive stone countertops. However, they work better in kitchens where wall mounting isn’t possible due to windows, backsplash design, or range hood placement.
Key Differences Between Mounting Styles
| Feature | Wall-Mounted | Deck-Mounted |
|---|---|---|
| Installation Complexity | High – requires wall penetration | Medium – requires countertop drilling |
| Counter Space Impact | None | Reduces usable space |
| Range Hood Clearance | Must clear by 6+ inches | Not applicable |
| Water Line Access | Behind wall | Under counter |
The Hidden Costs of Pot Filler Installation in Fairfield County
Beyond the $300-800 for the fixture itself, professional installation in Greenwich typically runs $800-1,500. The wide range depends on several factors specific to Fairfield County homes. Older homes in Riverside or Cos Cob often require additional work to reinforce walls that weren’t designed to support modern fixtures. The cost also increases if your range sits against an exterior wall where insulation and vapor barriers complicate the installation.
Permit requirements add another layer of cost. The Greenwich Building Department requires permits for new water line installations, which cost $150-300 depending on the scope. A licensed plumber must pull these permits and ensure compliance with Connecticut State Building Code Section 2903.5 for fixture installations. Skipping permits might save money upfront but creates liability if you sell your home. Connecticut State Building Code.
Water quality in Greenwich also affects your decision. The town’s hard water (8-12 grains per gallon) means mineral buildup on pot filler nozzles is common. Some homeowners opt for integrated filtration systems, adding $400-600 to the project. Without filtration, you’ll need to clean the aerator every 3-6 months to maintain proper flow. Why We Are the Top Rated Pipe Repair Specialists in Byram.
Step-by-Step Installation Process for Greenwich Homes
- Site Assessment
The plumber evaluates your kitchen layout, checking wall structure, existing plumbing access, and range hood clearance. This determines if wall mounting is feasible or if deck mounting is necessary.
- Permit Acquisition
Submit permit application to Greenwich Building Department with fixture specifications and installation plans. Approval typically takes 3-5 business days. EPA Lead-Free Plumbing Requirements.
- Wall Preparation
Cut access holes in drywall or plaster, typically 12×12 inches behind the range. In historic Greenwich homes, this often reveals unexpected obstacles like old wiring or structural supports.
- Water Line Installation
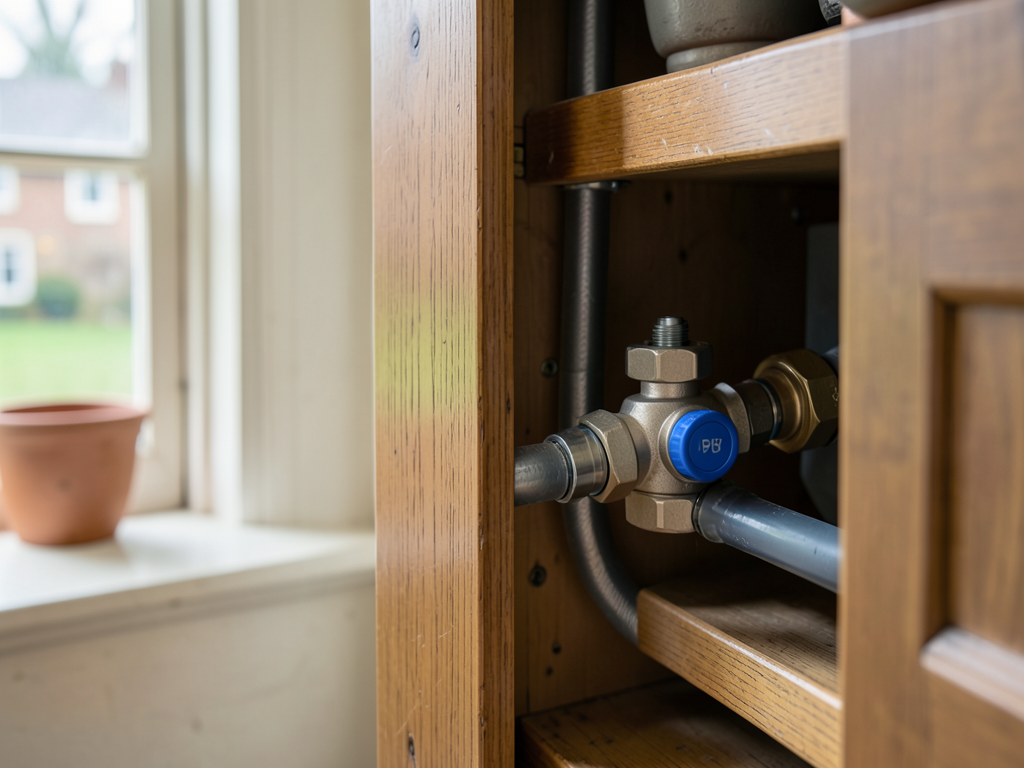
Run new cold water line using PEX or copper piping. PEX is preferred in Greenwich for its freeze resistance and ease of installation in tight wall cavities. Install shut-off valve within 6 feet of the fixture.
- Fixture Mounting
Secure mounting bracket to wall studs, ensuring it can support the extended weight of the fixture. Install pot filler and connect water supply.
- Pressure Testing
Pressurize the system and check for leaks at all connections. This step is critical in Greenwich homes where water pressure can fluctuate due to Aquarion Water Company’s aging infrastructure.
- Finish Work
Repair drywall, match existing wall texture, and seal around the fixture base to prevent moisture intrusion.
Greenwich Building Codes and Permit Requirements
The Connecticut State Building Code (based on the 2021 IPC) requires permits for any new fixture installation that involves modifying existing plumbing. In Greenwich, this falls under Section 105.1 of the local code, which mandates permits for water supply extensions. The Building Department also enforces Connecticut Public Act 22-80, which requires lead-free fixtures in all new installations.
Local inspectors look for several specific items during pot filler inspections. The shut-off valve must be accessible without removing the range, typically installed in an adjacent cabinet. The water line must be protected from freezing if it runs through exterior walls – a particular concern in Greenwich’s older homes where insulation may be inadequate. The fixture must also comply with maximum flow rate requirements of 2.2 gallons per minute.
Historic districts in Greenwich like the Strickland Road area have additional requirements. Any visible changes to exterior walls or significant modifications to interior walls in these districts may require approval from the Historic District Commission. This can add 2-3 weeks to your timeline.
Common Installation Problems and How to Avoid Them
The most frequent issue in Greenwich pot filler installations is inadequate wall support. Many older homes have 2×4 studs spaced 24 inches apart, which isn’t sufficient for the extended weight of a brass pot filler. Without proper reinforcement, the fixture can pull away from the wall over time, causing water damage to the backsplash.
Another common problem is incorrect height placement. The pot filler must be high enough to clear large pots but low enough to reach all burners. Standard height is 18-24 inches above the cooking surface, but this varies based on your range model. Professional ranges from Wolf or Viking often have different clearance requirements than standard models.
Water hammer is a less obvious but serious issue. When the pot filler’s quick-shut valve closes, it can create pressure spikes that damage pipes. Installing water hammer arrestors costs an additional $100-150 but prevents long-term plumbing damage. This is especially important in Greenwich’s older homes with cast iron drain lines that can’t handle pressure fluctuations. The Most Reliable Drain Cleaning Services in Old Greenwich.
Is a Pot Filler Worth It? The Real Cost-Benefit Analysis
The convenience factor is undeniable – filling a large stock pot directly on the stove saves time and effort. But the luxury comes with real costs. The average pot filler saves about 2-3 minutes per use, which adds up to maybe 30 minutes per month for most families. Is that worth $1,200-2,000 in installation costs plus the risk of water damage?
For Greenwich homeowners who frequently cook large meals or entertain, the convenience might justify the cost. Professional chefs often cite pot fillers as essential for high-volume cooking. However, for casual cooks, a simple pot filler might be more about kitchen aesthetics than practical utility.
The potential for water damage is the biggest risk factor. A slow leak behind a pot filler can go undetected for months, causing mold growth and structural damage. In Greenwich’s older homes with plaster walls, water damage repairs are particularly expensive because matching original textures is difficult and costly.
Maintenance Requirements for Long-Term Performance
Pot fillers require regular maintenance to prevent problems. The aerator screen should be cleaned every 3-6 months to remove mineral buildup from Greenwich’s hard water. The swing arm joints need occasional lubrication to prevent stiffness, and the shut-off valve should be exercised annually to ensure it operates smoothly.
Check for leaks quarterly by placing paper towels under the fixture and along the wall connections. Even small drips can cause significant damage over time. The flexible supply lines can degrade after 5-7 years, especially in homes with high chlorine levels in the water supply.
Winter preparation is crucial in Connecticut. If your pot filler is on an exterior wall, consider installing a frost-proof model or draining the line during extreme cold snaps. Frozen pipes can burst and cause catastrophic damage, particularly in homes where the pot filler is installed above valuable appliances.
Water Filtration Integration for Greenwich Kitchens
Greenwich’s water supply from Aquarion Water Company contains moderate levels of hardness and chlorine. These minerals can cause scale buildup on pot filler nozzles and affect water taste. Many homeowners opt to integrate their pot filler with the home’s main water filtration system.
Whole-house filtration systems cost $1,500-3,000 and protect all fixtures, including the pot filler. Point-of-use filters for just the pot filler cost $300-500 but require more frequent cartridge changes. The choice depends on whether you want filtered water for all kitchen uses or just for the pot filler.
Reverse osmosis systems are popular in Greenwich but require a separate faucet for drinking water. The pot filler should remain on the main cold water line because RO water flows too slowly for filling large pots. Some homeowners install a three-way faucet that provides hot, cold, and filtered water from a single unit.
Professional vs. DIY Installation: Why Experience Matters
Installing a pot filler might seem straightforward, but professional installation is worth the cost in Greenwich homes. Licensed plumbers understand local building codes, can navigate historic home challenges, and carry insurance that protects you if something goes wrong. A DIY installation that violates codes could void your home insurance or create liability issues. Emergency Plumbers in Greenwich Who Actually Answer the Phone at 3 AM.
Professional plumbers also have the right tools for the job. Cutting into plaster walls without the proper equipment can cause extensive damage. They also know how to properly support the fixture weight and ensure all connections are accessible for future maintenance.
The cost difference between DIY and professional installation is usually $300-500, but that savings disappears quickly if you damage your backsplash or cause a leak. Plus, professionals can complete the job in 4-6 hours versus 1-2 days for most DIYers.
Making the Final Decision for Your Greenwich Kitchen
Consider your cooking habits, kitchen layout, and long-term plans when deciding on a pot filler. If you cook large meals frequently and have the budget for professional installation, the convenience might be worth it. If you’re more of a casual cook or have budget constraints, the luxury might not justify the cost and potential risks.
Think about your home’s resale value too. In Greenwich’s luxury market, pot fillers are expected features in high-end kitchens. However, a poorly installed pot filler that causes water damage will hurt your home’s value far more than not having one at all.
Finally, consider the environmental impact. Pot fillers use more water than filling pots at the sink because they’re often left running while moving pots. If water conservation is important to you, this is another factor to weigh against the convenience benefits.
Frequently Asked Questions
How much does it cost to install a pot filler in Greenwich?
Professional installation typically costs $1,200-2,000 including the fixture, permits, and labor. The wide range depends on your kitchen layout, wall construction, and whether you need additional plumbing work.
Do I need a permit to install a pot filler in Greenwich?
Yes, the Greenwich Building Department requires permits for new fixture installations that involve modifying existing plumbing. Permit fees are $150-300, and a licensed plumber must pull the permit.
Can I install a pot filler myself to save money?
While possible, DIY installation is risky in Greenwich homes. Professional plumbers understand local codes, can handle historic home challenges, and carry insurance. A DIY mistake could cost far more than the installation savings.
What’s the best height for a pot filler above my range?
Standard height is 18-24 inches above the cooking surface, but this varies based on your range model. The pot filler must clear large pots while still reaching all burners.
How do I maintain my pot filler to prevent problems?
Clean the aerator every 3-6 months, check for leaks quarterly, and lubricate the swing arm joints annually. If your home has hard water, consider a filtration system to reduce mineral buildup.
Ready to Install Your Pot Filler?
Installing a pot filler in your Greenwich kitchen requires careful planning, proper permits, and professional expertise. The convenience is real, but so are the risks of water damage if not installed correctly. Before you commit, schedule a consultation with a licensed Greenwich plumber to assess your specific situation. Expert Boiler Repair for Historic Greenwich Homes.
Call (475) 320-3733 today to schedule your pot filler installation consultation. Our licensed plumbers understand Greenwich’s unique building codes, historic home challenges, and the specific requirements for professional-grade kitchen fixtures. Don’t risk water damage to your expensive range – get it done right the first time.
Pick up the phone and call (475) 320-3733 before the next storm hits. Greenwich’s older homes are particularly vulnerable to water damage, and a properly installed pot filler can be a valuable addition to your kitchen when done correctly.
{
“@context”: “https://schema.org”,
“@type”: “BlogPosting”,
“headline”: “Adding a Pot Filler Above Your Professional Range (Is the Plumbing Worth It?)”,
“description”: “Discover if a pot filler is worth the investment in your Greenwich kitchen. Learn about installation, costs, local codes, and potential leak risks over expensive appliances.”,
“wordCount”: 2273,
“datePublished”: “2026-05-16T15:57:00.000Z”,
“dateModified”: “2026-05-16T15:57:00.000Z”,
“inLanguage”: “en-US”,
“mainEntityOfPage”: {
“@type”: “WebPage”,
“@id”: “https://unitedplumbinggreenwich.com”
},
“publisher”: {
“@type”: “LocalBusiness”,
“name”: “United Plumbing Greenwich”,
“url”: “https://unitedplumbinggreenwich.com”
},
“author”: {
“@type”: “Organization”,
“name”: “United Plumbing Greenwich”,
“url”: “https://unitedplumbinggreenwich.com”
},
“image”: {
“@type”: “ImageObject”,
“url”: “https://unitedplumbinggreenwich.com/wp-content/uploads/2026/03/adding-a-pot-filler-above-your-professional-range-1.png”
}
}
{
“@context”: “https://schema.org”,
“@type”: “Plumber”,
“name”: “United Plumbing Greenwich”,
“url”: “https://unitedplumbinggreenwich.com”,
“address”: {
“@type”: “PostalAddress”,
“addressLocality”: “Greenwich”
},
“areaServed”: {
“@type”: “City”,
“name”: “Greenwich”
}
}
{
“@context”: “https://schema.org”,
“@type”: “FAQPage”,
“mainEntity”: [
{
“@type”: “Question”,
“name”: “Wall-Mounted vs. Deck-Mounted Pot Fillers: Which Fits Your Range?”,
“acceptedAnswer”: {
“@type”: “Answer”,
“text”: “Wall-mounted pot fillers are the most common choice for Greenwich kitchens. They attach directly to the wall behind the range and swing out to reach both front and back burners. The swing arm typically extends 20-24 inches and must clear the range hood by at least 6 inches. In older Greenwich homes with limited wall space, this can be challenging when dealing with existing backsplash tiles or electrical outlets.”
}
},
{
“@type”: “Question”,
“name”: “How much does it cost to install a pot filler in Greenwich?”,
“acceptedAnswer”: {
“@type”: “Answer”,
“text”: “Professional installation typically costs $1,200-2,000 including the fixture, permits, and labor. The wide range depends on your kitchen layout, wall construction, and whether you need additional plumbing work.”
}
},
{
“@type”: “Question”,
“name”: “Do I need a permit to install a pot filler in Greenwich?”,
“acceptedAnswer”: {
“@type”: “Answer”,
“text”: “Yes, the Greenwich Building Department requires permits for new fixture installations that involve modifying existing plumbing. Permit fees are $150-300, and a licensed plumber must pull the permit.”
}
},
{
“@type”: “Question”,
“name”: “Can I install a pot filler myself to save money?”,
“acceptedAnswer”: {
“@type”: “Answer”,
“text”: “While possible, DIY installation is risky in Greenwich homes. Professional plumbers understand local codes, can handle historic home challenges, and carry insurance. A DIY mistake could cost far more than the installation savings.”
}
},
{
“@type”: “Question”,
“name”: “What’s the best height for a pot filler above my range?”,
“acceptedAnswer”: {
“@type”: “Answer”,
“text”: “Standard height is 18-24 inches above the cooking surface, but this varies based on your range model. The pot filler must clear large pots while still reaching all burners.”
}
},
{
“@type”: “Question”,
“name”: “How do I maintain my pot filler to prevent problems?”,
“acceptedAnswer”: {
“@type”: “Answer”,
“text”: “Clean the aerator every 3-6 months, check for leaks quarterly, and lubricate the swing arm joints annually. If your home has hard water, consider a filtration system to reduce mineral buildup.”
}
},
{
“@type”: “Question”,
“name”: “Ready to Install Your Pot Filler?”,
“acceptedAnswer”: {
“@type”: “Answer”,
“text”: “Installing a pot filler in your Greenwich kitchen requires careful planning, proper permits, and professional expertise. The convenience is real, but so are the risks of water damage if not installed correctly. Before you commit, schedule a consultation with a licensed Greenwich plumber to assess your specific situation. Expert Boiler Repair for Historic Greenwich Homes.”
}
}
]
}
{
“@context”: “https://schema.org”,
“@type”: “HowTo”,
“name”: “Pot Filler Installation Process”,
“step”: [
{
“@type”: “HowToStep”,
“position”: 1,
“name”: “Site Assessment”,
“text”: “The plumber evaluates your kitchen layout, checking wall structure, existing plumbing access, and range hood clearance. This determines if wall mounting is feasible or if deck mounting is necessary.”
},
{
“@type”: “HowToStep”,
“position”: 2,
“name”: “Permit Acquisition”,
“text”: “Submit permit application to Greenwich Building Department with fixture specifications and installation plans. Approval typically takes 3-5 business days. EPA Lead-Free Plumbing Requirements.”
},
{
“@type”: “HowToStep”,
“position”: 3,
“name”: “Wall Preparation”,
“text”: “Cut access holes in drywall or plaster, typically 12×12 inches behind the range. In historic Greenwich homes, this often reveals unexpected obstacles like old wiring or structural supports.”
},
{
“@type”: “HowToStep”,
“position”: 4,
“name”: “Water Line Installation”,
“text”: “Run new cold water line using PEX or copper piping. PEX is preferred in Greenwich for its freeze resistance and ease of installation in tight wall cavities. Install shut-off valve within 6 feet of the fixture.”
},
{
“@type”: “HowToStep”,
“position”: 5,
“name”: “Fixture Mounting”,
“text”: “Secure mounting bracket to wall studs, ensuring it can support the extended weight of the fixture. Install pot filler and connect water supply.”
},
{
“@type”: “HowToStep”,
“position”: 6,
“name”: “Pressure Testing”,
“text”: “Pressurize the system and check for leaks at all connections. This step is critical in Greenwich homes where water pressure can fluctuate due to Aquarion Water Company’s aging infrastructure.”
},
{
“@type”: “HowToStep”,
“position”: 7,
“name”: “Finish Work”,
“text”: “Repair drywall, match existing wall texture, and seal around the fixture base to prevent moisture intrusion.”
}
],
“image”: “https://unitedplumbinggreenwich.com/wp-content/uploads/2026/03/adding-a-pot-filler-above-your-professional-range-1.png”
}
{
“@context”: “https://schema.org”,
“@type”: “BreadcrumbList”,
“itemListElement”: [
{
“@type”: “ListItem”,
“position”: 1,
“name”: “Home”,
“item”: “https://unitedplumbinggreenwich.com”
},
{
“@type”: “ListItem”,
“position”: 2,
“name”: “Blog”,
“item”: “https://unitedplumbinggreenwich.com/blog”
},
{
“@type”: “ListItem”,
“position”: 3,
“name”: “Adding a Pot Filler Above Your Professional Range (Is the Plumbing Worth It?)”
}
]
}
{
“@context”: “https://schema.org”,
“@type”: “Service”,
“serviceType”: “Plumbing”,
“provider”: {
“@type”: “LocalBusiness”,
“name”: “United Plumbing Greenwich”,
“url”: “https://unitedplumbinggreenwich.com”
},
“areaServed”: {
“@type”: “City”,
“name”: “Greenwich”
},
“description”: “Discover if a pot filler is worth the investment in your Greenwich kitchen. Learn about installation, costs, local codes, and potential leak risks over expensive appliances.”
}